Saturday, April 23, 2016

Repurposing Old Items

Reusing Items in a Different Way!


One of the things I love about decorating, partly because it is a challenge for creativity, and partly because I love seeing things be used in unexpected ways, is reusing items in a new way to make a space more visually interesting and dimensional.  I have a few examples I snapped on my camera around my house.

Example #1:

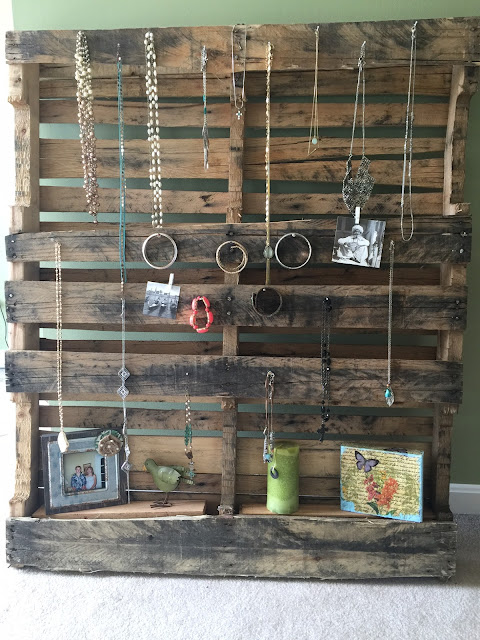
The Pallet Jewelry Showcase!


I love, love, love the way this came out.  I was given a few pallets from my sister and decided to use one as a way to display jewelry.  It works quite well!  Especially since prior to having this pallet, I was hanging all my necklaces on one nail.  Yeah, this is way better, and super cute!  No more tangles is also a definite plus.

Example #2 The Sideways Ladder Wall Filler-er (haha)

Shelf from Pier One

When looking for a way to fill this wall under this shelf, I thought how cute a ladder would be hung sideways.  At first I wanted to put pictures in the empty spaces, but ended up going with dried flowers from a bouqet my honey got for me :)  Love the way it turned out!


Example #3:  The INSIDE Shutters


Pitcher from IKEA

This idea came to me one afternoon when trying to decide what drapes would look good in my kitchen.  No color, no idea, was giving me the feeling of "YES!"  That is, until, I thought of shutters!  At my usual antique mall, they ALWAYS have a bunch of large shutters so I headed there and got a couple.  They were originally a dark, forest green.  I cleaned them up and gave them a fresh coat of, you guessed it!  Annie Sloan Old White Chalk Paint.  They just happened to be the perfect length of the window...talk about lucky!  (This girl right here!)

Example #4

The Overly Used Window Frame


Lamp from Homegoods, plant from Pier One, and Wreath from JoAnne Fabric

Yes, everyone and their sister decorates with window frames now, but, I mean, it is cute!  I got this window frame a couple years ago and it was only ten bucks.  Most people put a nice mirror in the center of their foyer, but why be like everyone else.  I wanted a window!  It is nice how it still reflects a lot of the sunlight coming in through the front.  

Thanks for checking out my blog!

Peace, Balance, and Gratitude!

Lanna

Wednesday, April 20, 2016

Towel Rack Makeover

Tired of Your Towel Rack?  Me Too!


If you are like me, you get bored with "builder grade" aspects of your home.  My bathroom is in major need of sprucing up and I am in the process of completely redoing it.  Right now, I am just getting some decor in there so I can feel out the color I want on the walls before rushing to a decision.  Lord knows, I don't want to have to paint more than once!

I was on Facebook yard sale, a frequently visited source of awesome things for cheap prices, and came across this shelf.  It was very cute and I knew it belonged with me.  I immediately thought it would be perfect to take place of the boring towel rack.  It was just plain wood, and it was a coarse wood, which is the perfect canvas for Annie Sloan Chalk Paint.

I thought I'd just paint it Old White, but I was wanting something different.  So I had a crazy idea...

Could I tint my chalk paint with acrylic paint?

I always have plenty of Old White on hand so I thought, "Hey!  It's worth a shot!"  So I began dripping it in my bowl of Old White, slowly, until I got the tint I wanted.  I decided on a light lavendar because it would compliment the decor already in the bathroom.


To my surprise it worked....PERFECTLY!  I was stoked!  So I painted away.......
One coat!


Two coats!


Now to sand my piece.  When I sand a piece, I use a 100 grit sandpaper and do it by hand around all the edges and heavy on the corners and curves of the piece to really accent these details.


You can see some of the detail in the piece after I completed sanding it, especially on the corners and on the curved edges...


So now the piece was ready and I was ready to TAKE DOWN THAT RACK!
So I took it down, removed all the screws and anchors, and hung my piece

LOOOOOVE!


Thanks so much for reading!  Hope you enjoyed my idea for how to replace your towel rack!  I will be continuing to add blogs about the face-lift my guest bathroom is receiving.

Peace, Love, and Gratitude,
Lanna


Saturday, April 16, 2016

Bedroom Makeover

Bedroom Makeover!


Here she is!


When we first looked at our house, one of the major selling features was the master bedroom.  We loved how large it was complete with an office and a master bathroom.  

However, there were a few things we weren't so sold on, they were as follows:

                 #1   The dark purple wall- really, did you need that dark of a                        purple wall?

                 #2   All the wood trim and doors- although good quality, 
                        I love white trim and doors, however the entire house was                      wood trim and doors, was it worth the undertaking?

                  #3   The sliding door between the office and bedroom 
                         that didn't work so well...

Here are the pictures; you can clearly see the differences we made!


The dark purple wall was number one on my list to cover.  We used a really beautiful color from Benjamin Moore called Stone Hearth.  This color is so warm and relaxing, and complements the green dressers.  It only took about four coats to finallllly cover the dreaded purple wall..ugh.  Painful, but WORTH IT!

So long, dreaded purple wall!!


You can see my husband and FIL also installed french doors where the sliding doors once were.  These doors were so much better quality and really made a HUGE difference to the look of the room.  What I think really made the biggest difference of this room and the rest of the house is the painting of the trim and doors to a semi-gloss white.  I will be doing a post on how I paint trim and doors very soon!  The white trim and doors really pop against the Benjamin Moore paint.


        My bed.....ahhhh...my bed.  I am completely obsessed with my bed.  My husband got me my dream bed last year for Valentine's Day.  It is the Coventry Sleigh bed by Riverside Furniture.  The bedding and bright throw pillows are Pier One.  The other larger throw pillows are from TJ Maxx, and the picture frames are from Michaels.

      These dressers were my parents for over twenty years.  I gave them new life with Miss Mustard Seed's Milk Paint in Boxwood.  Milk paint is another organic paint I use besides the chalk paint.  It has its pros and cons.  Cons include that it comes in powder form so you have to be sure you mix it up to the right consistency, and also the color can vary slightly.  For example, I used the Boxwood which is a dark green, and from clumps of blue and yellow powder I had a few streaks I had to even out.  It wasn't hard, but just FYI.  Pros include the fact that it completely distresses itself!  It just starts peeling off, but be careful if it is too slick of a surface, it will not stick at all.  I will talk more about my work with Miss Mustard Seed's Milk Paint in a future post.


            The last part of the bedroom I'd like to share is the vanity area.  I got this desk which I re-purposed as a vanity from an estate sale for twenty-five dollars (major score!).  I am telling you, if you do not go estate sale shopping, you are missing out, my friends!  All the more for me, I suppose!  :)  The mirror and pictures were my mothers.  I hung them in a cluster, as I feel hanging in clusters at eye level really give your home a cozy sense of character.  I'm not going to lie, I was proud of this side of the room and how it came together!


Well, there it is!  My bedroom makeover!  Hope you enjoyed!
I will be posting soon about how we did the trim and door painting, as well as some examples of work with milk paint!  Thanks for reading!

Peace, Balance, and Gratitude,
Lanna


Wednesday, April 13, 2016

Decorating Corners

How To Decorate Your Corners!


Question:

How do I know which corners to decorate?

Answer:

The only corners of a room you should decorate are corners that are at a threshold and have enough space to stand a small table in, this is a good rule of thumb.   For example, I wouldn't just pick a corner out of any room and decorate it.  You should only decorate corners that have plenty of wall and floor space and that are at a threshold of two rooms.  I chose a large corner in my foyer between the foyer and the dining room as well as a large corner between my family room and kitchen.  The corner should sort of be a "dead space".  This means that it is absolutely out of the way of traffic.  

Question:

How do I go about decorating a corner?

Answer:

When decorating a corner, I like to decorate from eye level down,
 incorporate a small piece of furniture for some dimension, 
and have varying levels to make it interesting to the eye.

Question:

How do you hang your pictures in a cluster?

Answer:

When hanging pictures, always center over the piece 
of furniture, and always hang slightly above eye level or below.  
If you are hanging a picture below another, 
be sure they are not spaced very far apart, but far enough to 
cover a good amount of your space without going too low or too high.  
It is all about being symmetrical and even!


Example 1:


This is my foyer corner I decided to decorate because it is a place where
 no traffic will ever travel through, a large area, and the perfect space to display some cute decor to welcome guests!


I began decorating it by hanging
 the pictures at slightly above eye level and below in the center of the walls.  They followed the same color scheme, and as I have said before, once I have a color scheme, there is no stopping me!  
The coat rack I found in my mother's garage and she ever-so-graciously gave me.  The mirror was given to me by my older sister and my two other pictures where inherited from my grandmothers.  I love that all of these come from people I love.  


   After the pictures were hung, I knew I needed a small piece of furniture to find a home in this corner to give some dimension to the space.  I found this table at an estate sale for ten dollars and gave it a couple coats of Annie Sloan Chalk Paint in Old White.  You can never go wrong with Old White, just FYI.  I then framed the key my mother got my husband and I for our "first home" gift.  It is a decorative key with a cream ribbon and has our address and year we bought our house on it, I truly love it.  I set it against polka-dot burlap background and framed it.  I love doing unexpected things, like using a different background for the frame.
:)
 

Example 2:


This is perhaps my favorite corner in our house.  I found this door with this gorgeous glass knob at an antique store for....wait for it........ten dollars!!!  The chair I found at an estate sale for twenty-five dollars and I absolutely love the authenticity of this piece.  The pillow and wreath are from Joanne Fabric


Details of the "door" corner


Details make all the difference in any decorating you do.  This glass knob really gives this area the character that I love and that gives me that "homey" sense.  Hanging the wreath up was quite the project in itself.  If you would like more detail on anything in this post, let me know with a comment below!

Thanks so much for reading my post on how to decorate corners!
Hope you enjoyed!  

Peace, Balance, and Gratitude,

Lanna


Saturday, April 9, 2016

Shutter Repurposing

The Annoying Skinny Wall Solution!


So, I have this wall that I'm sure everyone can relate to.  The wall that is too skinny to put up a regular sized piece of decor, but too wide to not have any decor.  Tragic, I know!  So then this wall ends up sitting desolate in the guest bathroom for two years.  I walk by this wall everyday and today, I had the solution!  In my upstairs hallway, I have what used to be our headboard, five brown shutters all together, that I plan on making into a photo collage.  It looks like so....


Not much to look at right now, but it will be cute in the future!  I swear!

So I decide that, hey, I don't need all of those in the hallway.  One can come with me to fill in our skinny-wall-annoying spot.  So I take down one and begin glossing it over with my go to Annie Sloan Old White paint with a number 9 round-tip Artist Loft brush.


A lot of the time a project takes on a life of it's own and I just kind of follow it.  I started out thinking I would highlight the edges then didn't like the way that was going so just decided to do a whole coat!


I then had this.  Eh, not too exciting, but it was just one coat.  One coat of chalk paint is just enough to make you panic thinking that you have completely ruined your piece.  You have not, continue painting with no regret!  I did decide I wanted more contrast so I flipped up the shutters so they were brown and then did a dry brush with barely any paint on my brush on the tops.


I loved the way this was turning out.  Again, I was just kind of going with my gut as the project worked itself out.  So then, I hung it up!  So long skinny, annoying spot!


Still, it was cute, but needed more.  I love the purple in the painting next to it, so I decided to "tzuje" it up (the internet says that is spelled correctly so don't judge me, haha) with some purple flowers to make it pop.


Yes!   It just feels right!

Here she is in her spot and now the wall is desolate no more!


Thanks for reading!  I hoped you enjoyed!

Peace, Balance, and Gratitude,

Lanna

Dresser Refinish with Annie Sloan Chalk Paint

Dresser Project!  


Moving into a large 3 bedroom house after living in a one bedroom apartment for.... ooooohhh......seven years (give or take a couple) causes you to need lots of furniture, suddenly!  My husbands' parents were very gracious and gave us a chest of drawers and dresser set.  While decorating the guest room I found these pillows at TJ Maxx that I absolutely loved!  Especially the tealy-turquoisy color that ran throughout the design, yes, that's a technical color name.  Here are the pillows that inspired!


inspiring pillows!


 I usually like to base a design for a room on something that I find that I love the colors of.  Since I fell in love with the color scheme in this pillow, I pulled the turquoise and old white to use for the furniture.  


                 Annie Sloan Chalk Paint has always been my absolute FAV paint to work with.  It is the easiest to use with no prep needed.  You literally just slap on a couple coats, use sandpaper to shabby if desired, then throw a coat of Minwax on it and......VOILA!  Done, with a brand new redone cutesy shabby dresser.....if you don't look toooo closely!


Annie Sloan Chalk Paint in Provence and Old White

Here are the completed before and after dressers in all their glory!  
I absolutely LOVE the way the Old White and Provence colors came together.


And now, how they look all situated in their new
 room with their lovely
 matching color scheme pillows!
(this room is still a work in progress!)


THANKS FOR READING MY FIRST PROJECT POST!  Woo hoo!  Come back for more!

Peace, Balance, and Gratitude
Lanna

Oh, hi!

Oh, hi!

        
          Hello!  My name is Alanna, known to most as Lanna because apparently the first "A" just causes too much confusion and is too many syllables.  I like to find the fun and laughs in everything I do.  Life is too short to take seriously, although, I am fairly certain I could never take it seriously even though perhaps I should at some point.  Or not.  I say a little too much of what is on my mind, I am slightly inappropriate (especially in my workplace), but I am always honest and sarcastic and people always know exactly how I feel about everything.
        I have  created this blog to share a true passion of mine.  I love everything creative about making a house a home, and have worked with my husband to completely redecorate our house.  I also refurnish furniture and paint nearly everything in sight in order to feel a new sense of home.  I would like to share my projects with you with a sense of humor.  I love to do all projects, but I must admit I am not a perfectionist that does things by the book.  I complete projects in my own right, until I am happy with them.  I mean, that's the point isn't it? I am making yourself happy!  Anywho, hence my blog title "Do Not Look Too Closely." Although I take pride in my projects, please, do not look too closely. :
)